
 You guessed it, more snowflakes.
Wednesday, November 19, 2008

Tuesday, November 18, 2008
Snowflakes
 I'm working on snowflake patterns for my winter digital work. There will be a lot of these in Craft Amor's future.
(click to enlarge)
Saturday, November 15, 2008
Final Try
.jpg) This week's theme at Inspire Me Thursday is "coffee break."
This week's theme at Inspire Me Thursday is "coffee break."My graphic. The graphic's evolution is down below.
Coffee Break 2
 Here's the evolution of what I worked on today for Inspire Me Thursday.
I took the McJumpquez's comment and added color to the steam. I have them red for love but the reds aren't translating well from my Photoshop file to the web conversion. I'm still mastering opacity so that's part of it.
I like:
I like the more dramatic values of the squares. I'm still deciding if I like squarer shape, and I'm leaning toward yes. I like the love in the base of the cup. I like how it creates the corner. Also the white line running behind the mug added a lot and helps the lettering placement make visual sense.
 I don't like:
The color and value (but I think mostly value) of the steam hearts makes them hard to see. The cup jumps because it's an 8 while the dark hearts are almost the same value as the dark gray on the right. I prefer the hearts' hue in the bottom images, but the orange hearts stand out better.
I need to repeat the black somewhere or cut off an edge of the cup. I tried cropping the cup edge and it makes the image unbalanced. However the big block of an 8 value grabs focus instead of the steam. It's amazing actually that even though the hearts are red they command less attention than that (almost) black mug. Oh the power of Values.
(click for larger images)
Friday, November 14, 2008
Coffee Break
.jpg) The Inspire Me Thursday's theme is "Coffee Break." Here's my first graphic although I'm not going to link until I've thought about it a wee bit. I like the heart steam but I'm not sure about the colors or the text. I look at it and sort of think, "What's the point of looking at this?"
The Inspire Me Thursday's theme is "Coffee Break." Here's my first graphic although I'm not going to link until I've thought about it a wee bit. I like the heart steam but I'm not sure about the colors or the text. I look at it and sort of think, "What's the point of looking at this?"Thursday, November 13, 2008
No Drinking and Shooting
 I made both of the papers used here. When I thought about combining them for a card the cup paper was blue in my mind. Blue and silver...because those are the paints I used. Yet when I glued it down against the copper brown color it seems very green. Green isn't bad but it has this camouflage feel that is a bit confusing. As in, "Why is my martini ready for hunting season and what does this have to do with thanks?"
I'm sending it anyway!
(ps- It's a thank you card for a friend who hosted a cast party at her house.)
Tuesday, November 11, 2008
Graffiti- First Attempt
.jpg) I can never spell "graffiti" right. I have to spell check it every time.
I can never spell "graffiti" right. I have to spell check it every time.OK, so this is my first attempt at vectors in the graffiti style. At 17, I visited Berlin and fell in love with graffiti. My German cousin is a graffiti artist and took me on an East/West wall art tour and since then I have sought it out in every country I've visited. I've still never seen anything as cool as Berlin but in the graffiti world that makes sense.
Lisa Engelbrecht mentioned graffiti a lot when we filmed her DVD. Now that I have my evenings and weekends back I'll be working on calligraphy and font play in general.
Friday, November 07, 2008
peace and joy
.jpg)
I'm giving in to the Christmas spirit. I'm not a humbugger but I find holidays overwhelming. I don't like crowds. I don't like guilt. I like mankind and the idea of being surrounded by those we love. But Christmas music has started in the stores, and I can feel my blood pressure creeping skyward. Instead of fighting it, I'm going to embrace it. And by embrace I mean start making cards. That's how I cope with something: make a card.
So here's attempt one of hopefully many. I like the swirls (which is a big deal actually for me) but I'm not sure about their placement. The card is trying to incorporate a few too many different design feels, and I think it hurts the cohesion. Also, it's heavy to the right.
Tuesday, November 04, 2008
Autumn Paper
 Last night I worked on paper for autumn cards. I like how the paper turned out but realized the leaf print was too large for cards. It wouldn't read on a 4x6" area.
1. Brown paper and covered it in Mod Podge.
2. I cut out a stencil in cereal box cardboard and applied brown craft paint with the design.
3. I painted a green glaze (craft paint and Golden glazing medium) and used bubble wrap to create texture.

4. Back to the cardboard stencil with light violet glaze (purple craft paint and Golden glazing medium.) I also used the leaf shape remaining from the stencil cut and painted around the outside edge of it.
5. Stencil and copper paint. When the paint was still wet I used a rubber leaf stamp and stamped off the wet paint.
6. Second purple paint glaze. This one a bit darker.
7. Mod Podge.
Monday, November 03, 2008
Oh Sun, See You in June
.jpg) This pattern is in exact opposition to what I'm seeing outside of my office window today. It's cold. It's dark. It's blustery and wet. September and October were some of the prettiest I've ever seen here in Oregon. November might just let us have it.
This pattern is in exact opposition to what I'm seeing outside of my office window today. It's cold. It's dark. It's blustery and wet. September and October were some of the prettiest I've ever seen here in Oregon. November might just let us have it.As I was browsing Michael's yesterday for post-Halloween sales, I realized that I often get excited about a holiday right after it's over. Maybe it's because the pressure is gone. So I've decided that I can make cards for any time of year at any time during the year. I'll just keep them and send them appropriately. I know this isn't a rocket science realization but it's funny how we need to give ourselves official permission to do certain things. I've given myself permission. I'm also writing it down (here) for when I forget.
Friday, October 31, 2008
Vector Hair
.jpg) I'm learning how to do vector hair. Or at least I'm trying to learn. This is formal attempt #1. The original image is from Anthropologie by way of ffffound.com
I'm learning how to do vector hair. Or at least I'm trying to learn. This is formal attempt #1. The original image is from Anthropologie by way of ffffound.comThe goal is to not completely replicate the source material but use it as a guide.
Thursday, October 30, 2008
Dia de los Muertos
.jpg) Perfect timing! This week's Inspire Me Thursday is Dia de los Muertos. I was originally going to post these after I sent them off to family and friends...but tomorrow is Halloween and I still haven't. (Sorry Andrea...yours is totally coming...eventually)
Perfect timing! This week's Inspire Me Thursday is Dia de los Muertos. I was originally going to post these after I sent them off to family and friends...but tomorrow is Halloween and I still haven't. (Sorry Andrea...yours is totally coming...eventually)Happy Halloween!
Envelopes
.jpg) Last year for Halloween I folded a bunch of envelopes out of lime green wrapping paper. It was a lot of fun and a lot of work. This year I took white envelopes and had at them with stencils and inexpensive craft paint. Some came out better than others but it was a good excuse to let my mind wander and just play.
Last year for Halloween I folded a bunch of envelopes out of lime green wrapping paper. It was a lot of fun and a lot of work. This year I took white envelopes and had at them with stencils and inexpensive craft paint. Some came out better than others but it was a good excuse to let my mind wander and just play.Now...if only I'd send those cards.
Tuesday, October 28, 2008
Halloween Fabric Ornaments
.jpg) Ingredients
IngredientsCereal Box Cardboard
Fabric
Ribbon (I used 3/16 in)
Tape
Scissors
Hot Glue Gun
Recipe
1. I used the top of a Jacquard Textile bottle to trace circles. Cut the circles out and place them on a small square of fabric.
.jpg) 2. Tape the ribbon down on either side of the cardboard. Circle the cardboard with a ring of hot glue.
2. Tape the ribbon down on either side of the cardboard. Circle the cardboard with a ring of hot glue.3. Place the second piece of scrap fabric over the top to create a sandwich. Press down lightly with your fingers. (Careful it's hot.)
4. Cut around the hot glue.
5. Hang on your gesso-painted branches.
.jpg)
Painted Pumpkin
.jpg) This pumpkin is simply a combination of 3 inexpensive craft paints (orange, brown and copper) and a final coat of gloss Mod Podge.
This pumpkin is simply a combination of 3 inexpensive craft paints (orange, brown and copper) and a final coat of gloss Mod Podge.This project was fast and easy and could make very cool decorations for either Halloween or Thanksgiving.
Mummy Fingers
.jpg) I'm making little mummy fingers for the cast and crew of the show I'm in. Here's a finished bundle. Originally I was going to make them into a necklace or at least give each person 5...but then I ate them. And I know myself better than to go back to the store and buy more...because I'd eat those too. (Ahk!)
I'm making little mummy fingers for the cast and crew of the show I'm in. Here's a finished bundle. Originally I was going to make them into a necklace or at least give each person 5...but then I ate them. And I know myself better than to go back to the store and buy more...because I'd eat those too. (Ahk!).jpg)
Tuesday, October 14, 2008
Twix Mummy Fingers
.jpg) Ingredients:
Ingredients:Mini Twix
Plastic Wrap (Saran wrap)
Tape
Brown Floral Tape
Small Sponge
White Gesso
Brown Acrylic Paint
Glue
Red paper
Red Fingernail Polish
Recipe:
1. Cover wrapped Twix with plastic wrap. Just enough to hold down the edges of the Twix wrapper. Tape.
.jpg) 2. Wrap in brown floral tape. I wrap the ends first and then the length.
2. Wrap in brown floral tape. I wrap the ends first and then the length.3. Use a small sponge and dab on brown paint. Dab on white gesso. Let blend a bit on the finger.
4. Cut out fingernail from red paper. Glue on end. Paint with red fingernail polish.
Monday, October 06, 2008
Halloween Card-work in progress
.jpg)
This makes it Halloween.
I need vines but I'm terrible at drawing vines. There is something I can never quite get right. I don't even know what it is but after I finish trying to do vines something just always seems off.
I'm not sure about the placement of the type. Maybe the pumpkin needs to be bigger.
OK, number 2 is bigger. Still unsure. I want to see more of the green damask pattern.
Work in progress.
.jpg)


Wednesday, October 01, 2008

Tuesday, September 30, 2008
Halloween Card Tutorial
.jpg) Ingredients:
Ingredients:Assortment of Inexpensive Craft Paints (I like to use metallic and glitter paints in analogous colors.)
Black Gesso
Mod Podge Gloss
Paint Brushes
Sponges
White Wrapping Paper with Design
Recipe:
Black Paper (for backgrounds)-
Take white wrapping paper (mine was white and silver #3) and paint a thin layer of black gesso (#1). Let it dry and then cover the paper in Mod Podge for sheen.
.jpg) White Paper-
White Paper-Take plain office paper and cover it with white paint and pearl metallic paint. After it dries, cover it in Mod Podge.
Orange Paper (#2)-
This paper is a combination of browns, oranges, golds, copper, and orange glitter paint all dabbed about haphazardly on white office paper. There is no wrong way to do this so have fun. When the paint dries, paint on a layer of Mod Podge.
.jpg) Green Paper-
Green Paper-Use several colors of green paint. Add a little copper and green glitter paint to give it sparkle. After paint dries, paint a coat of Mod Podge.
I cut out my designs (using an XACTO knife for the skull's teeth), glued everything down with the Mod Podge onto precut cards. After the medium dried I used sharpies to draw designs on the skull.
John Salminen Interview Excerpt (continued)
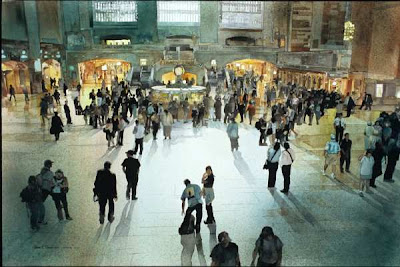 John Salminen (continued): In the early 80s, I had an opportunity to study with Cheng-Khee Chee at the University of Minnesota and Chee, at that time, was being introduced to western design and he was sharing all of that with us in the class. That was actually my first experience with a practical application for design, how you can use design to actually improve the painting that you were working on.
Creative Catalyst: And this was a major breakthrough ?
John: I think it was. As I look at it now, it’s been such a dominant influence on my thinking and my work. I don’t know if I recognized it as a break through at the time, but everyone in the class, and I’m sure this is fairly typical, we all wanted to paint just like Chee. I realized early on that that was not a productive route to follow, to be the second Cheng-Khee Chee. I had been looking around for other painters and discovered Robert Wood and the whole California school of fast and loose painters.
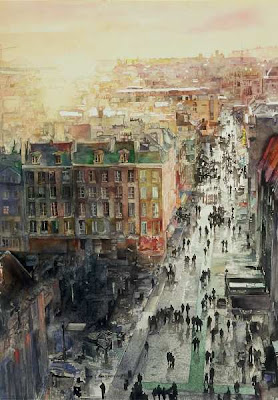 In that genre, I fixated for a while on a California painter named Morris Shulman and in particular his paintings called “Bus Stop” and “The Arches.” For the next couple years I literally copied Morris Shulman. I had Chee, Robert Wood and Morris Shulman and I was internalizing what they were doing by attempting to copy them. All of a sudden one day someone came up to me and they said, ''We saw one of your paintings. We always recognize your work by its style.'' I hadn’t really thought at all about having a style at that point in time, and in reality, there was the combined influence of de Koonig and Franz Kline and Cheng-Khee Chee and Robert Wood and the California painters and everything else I’d seen along the way that probably had an affect.
Images: John Salminen
To read the first part of the excerpt, go here:
Monday, September 29, 2008
Congratulations Nicholas Simmons
.jpg) Watermedia artist Nicholas Simmons won top prize at the Pennsylvania Watercolor Society for his piece Tokyo Express (originally titled Canton Express.)
Watermedia artist Nicholas Simmons won top prize at the Pennsylvania Watercolor Society for his piece Tokyo Express (originally titled Canton Express.)Catch the opening October 12 at Westchester Art Association.
Wednesday, September 24, 2008
Halloween Dino
 Working on newsletter. Should come out tomorrow.
Posting has been a bit sparse in that in my non-work life I'm getting closer and closer to opening night for the play I'm in. Next week starts rehearsals for 3hours a night, 5 nights a week. Which is only slightly different than the past weeks at 4 nights a week. I'm not complaining though every moment of this production has been a blast.
Back to the newsletter!
Tuesday, September 16, 2008
Learn to Carve Your Own Stamps
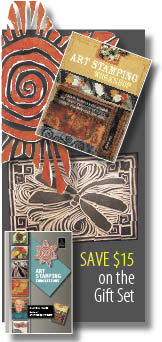
I think I've said this before, I'm a terrible stamper. There is a look I never achieve with store bought rubber stamps. Other artists can do it. I've seen beautiful work...but it's not for me. This is why I was so surprised at how quickly I fell in love with carving my own stamps. There is a tactile quality in the process, and I love how you can see cut marks in the final print. I had no idea how carving my own stamps would change the way I approach my work both on the computer and on the page but it has. I have Gloria Page to thank for all of that.
This week at work they are putting the Gloria Page gift set on sale. People save $15 if they buy Gloria's book and art instruction DVD together. If you're interested go to Creative Catalyst Production's site: here.
Monday, September 15, 2008
(web).jpg)
Friday, September 12, 2008

Thursday, September 11, 2008
(web).jpg)
Wednesday, September 10, 2008
More Patterns
.jpg)
I played around with more damask today. Every once and awhile when I needed a break from editing I'd add a leaf or put in polka dots. Here's what I came up with. I think I like it for the most part.
Tuesday, September 09, 2008
Hello autumn
 I'm starting to get damask. It's a limited knowledge, but it's slowly developing. Paisley? Paisley is a whole other beast.
Friday, September 05, 2008
Digging through computer
 I've literally spent the last 7 hours (minus an hour for lunch break) going through every folder on my computer and cleaning it out. Six hours! And I can't even tell how much progress I've made. The fun part however is finding little graphics I started for projects. Here's one for a blog I was going to do but then never did. I think it's an OK start. Ugh. Back to it.
Thursday, September 04, 2008
Autumn 2008
.jpg)
.jpg) Spelling what?
Spelling what?I like where they're headed but I think the 2 and the 8 are cut off too much. Not quite sure what to do there. I think I like the colors but I might play around a bit here as well. Seems sparse. Originally I wanted to do it like a poster for a band, but when I flipped it to a horizontal document I feel like I'm making more of a post card.
Wednesday, September 03, 2008
Beading/Wiring Attempt #1
 This is my first attempt in a long time at making jewelry that wasn't an earring. Also, I seriously bruised my palm from gripping my pliers so hard, and we'll be stepping on wire bits in the apartment for some time. To put it nicely, I have a lot to learn. But that said I'm pretty happy with how it came out, and it already has clothing to go with it. Score!
Tuesday, September 02, 2008
Creativity
(web).jpg) I'm still moving. How long does it take to move? Well, when you have as much stuff as I have, apparently a long time. (It doesn't help however that my evenings are now spent in rehearsal and most nights I won't get home until 10pm starting tonight but that is an aside.) I had this realization on Friday that I desperately needed to do something with my hands. My new studio is still mostly a cardboard box growth culture and I might know where my paints are but that doesn't mean I've yet located my brushes OR have a surface on which to paint. So I opened my stamp drawer. I literally used a few colors and grabbed for stamps at random and worked off of whatever was on the floor next to me whether it be a 6x8 index card or a piece of green painted paper. And for about 30 minutes I just played. It felt good and reminded me of why it's so important I get focused and put my studio together.
I'm still moving. How long does it take to move? Well, when you have as much stuff as I have, apparently a long time. (It doesn't help however that my evenings are now spent in rehearsal and most nights I won't get home until 10pm starting tonight but that is an aside.) I had this realization on Friday that I desperately needed to do something with my hands. My new studio is still mostly a cardboard box growth culture and I might know where my paints are but that doesn't mean I've yet located my brushes OR have a surface on which to paint. So I opened my stamp drawer. I literally used a few colors and grabbed for stamps at random and worked off of whatever was on the floor next to me whether it be a 6x8 index card or a piece of green painted paper. And for about 30 minutes I just played. It felt good and reminded me of why it's so important I get focused and put my studio together.Thursday, August 28, 2008
Sherri Haab's "Resin Jewelry"
I am so excited to work on resin this holiday season (is it too early to get excited about the holiday season?) Here is an excerpt from Sherri Haab's DVD craft workshop, "Resin Jewelry."
Monday, August 25, 2008
Thursday, August 21, 2008
.jpg) I posted this some time ago but it's been brought to the light again. I think I still like it. I find that the most frustrating part of poster design (freelance design) is how you have to change the design to fit all the information they want on there but didn't tell you originally. So you design it with a certain amount of type in mind and then find out right at the very end all the additional type. I think it's too easy for people (me included) to think of type as something different than the design as a whole. Type isn't separate from a poster, it IS a poster.
I posted this some time ago but it's been brought to the light again. I think I still like it. I find that the most frustrating part of poster design (freelance design) is how you have to change the design to fit all the information they want on there but didn't tell you originally. So you design it with a certain amount of type in mind and then find out right at the very end all the additional type. I think it's too easy for people (me included) to think of type as something different than the design as a whole. Type isn't separate from a poster, it IS a poster.Wednesday, August 20, 2008
Santa paper

OK, it makes my eyes bleed just a little being this small...but who doesn't need Santa paper in well, August.
Rhetorical question.
Tuesday, August 19, 2008
Encore Poster
.jpg) Poster I did for a show this last spring. The designer is doing an encore show in October and so hopefully you'll be seeing these out and about here pretty soon.
Poster I did for a show this last spring. The designer is doing an encore show in October and so hopefully you'll be seeing these out and about here pretty soon.
Subscribe to:
Posts (Atom)


