Monday, December 12, 2011

Holiday Paint Out Week 3: Joy

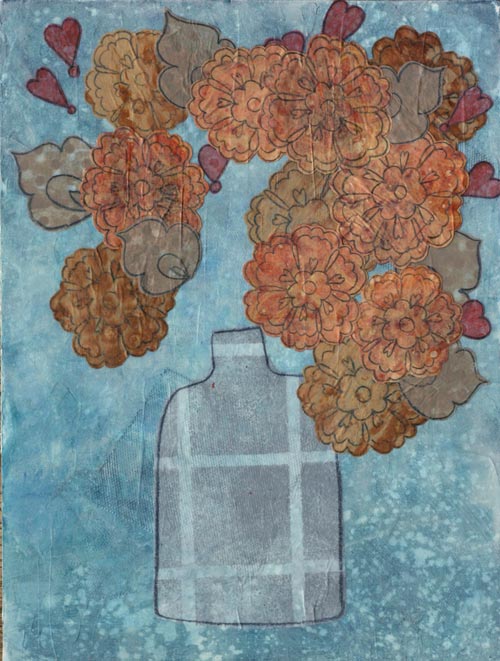
Here's my final image for this week's Holiday Paint Out with Creative Catalyst Productions. This week's prompt was "Joy," and for me there is something incredibly joyful about a fresh bouquet of flowers. Especially at this time of year in Oregon.

I have mixed feelings about the piece's outcome. I have to remind myself that I'm still struggling with basic things like color mixing, design, and composition. It's easy to get critical at a point in the learning process where really I should keep my criticisms quiet and just keep creating. The thing between me now and where I want to be is probably a couple hundred hours of practice so that is what I will keep doing.

Monday, December 05, 2011

Holiday Paint Out Week 2: Peace

I'm just coming in under the wire on this week's Holiday Paint Out with Creative Catalyst Productions. I have mixed feelings about it. I know I want to use this type of stenciling, but I'm not yet sure if I want the value to go light to dark or dark to light. I'm also not completely clear in my head about how to do that.

I do know thought that if you put too much matte medium in your fluid acrylics, yes, it makes a very subtle glaze, but oh goodness you may spend 3 hours trying to get anything dark.

This was originally just sort of the throw away piece, but then it developed better than the rest. Due to the time crunch, it has the darkest section smack dab in the middle. That creates a good challenge to work through!

I need to keep working with the silhouette idea. I also probably need to learn how to draw. Oh *sigh.*

Sunday, November 27, 2011

Holiday Paint Out: Community

I'm doing the Holiday Paint Out over at Creative Catalyst Productions, and this is my first entry. The prompt was the word "community" and I thought about Thanksgiving. I was trying to evoke a sense of being around a table but your perspective is up through the flowers. As I learn to draw better hopefully I'll do a better job at capturing gesture and all of that. But until then, basic human shapes it is!

I used a mix of Anne Bagby 2 (Pattern & Form: Advanced Collage Techniques) and Jane Davies (DVD release set 2012) for the papers.

To see the steps, click "read more" down at the bottom.

Sunday, September 25, 2011

Weekend Wax, "First Rain"

Here's my weekend's attempt at beeswax collage. I always forget how slow beeswax collage is compared to collage where there's paint and mediums flying. So yes, there was a little fight with the new skill set but it was completely worth it and I'm hooked.

 Click read more at the bottom to see the step by step.


Wednesday, July 06, 2011

Love Story

I have been somewhat absent from CraftAmor, but there is a glimmer of hope that I can return. Work and weddings and all things merry. BUT I finished a project long in the making. And by long I mean, I mean I did 99% of it together and then sat on the final 1% debating music until LAST NIGHT I finally said, "Oh wait, this could be finished." And alas. There it was.

Monday, May 09, 2011


On Friday I introduced you to Yarn Engagement Buds. Here are those beauties in action. Here they are as part of the flowers at my sister's engagement party. Most people didn't even realize they were yarn and it was great to see them realize that they weren't what they expected.

(Also, seeing all these pictures of donuts just makes me want to wander down the street and buy a donut!)

Friday, May 06, 2011

Week 5: Engagement Buds or Yarn Buds

Photo tutorial after the jump.

Wednesday, May 04, 2011

Happy Birthday Card

I love the happy birthday card.

Monday, May 02, 2011

Felt Monograms

Here is one of the crafts I did for my sister's (and husband-to-be's) engagement party. I think if I were to do it again, I would make the felt leaves even smaller although, that would be even more work. *Phew!*

I cut a bunch of felt leaves and then hot glued them down to poster board. I then glued those letters down onto a larger sheet of poster board I painted grey. There is soooo much hot glue gun action some days in my house.

I then taped the back of it (yes classy right?) to a wire coat hanger. This was so that I could hang it up on a wreath wrack on the door.

Friday, April 29, 2011

Week 4: Felt Circle Flowers

Fabric flowers don't have to complicated. They don't need a lot of complicated twists and folds. Sometimes all you need are a bunch of circles to bright someone's day.

Wednesday, April 27, 2011

Heart Ring

Wedding cards have caused me trouble in the past. Up until a few years ago, I had gone to zero weddings so I had little to no experience with the genre. The first few I made were *awful.* Aaaaand then two years ago the weddings began and this year we're attending four so I need to get on my game.  I really love cards and I want to be able to create something from the heart for these people I care deeply about. Here is try #1. I think it's a pretty good first effort. The values are all a bit too similar (a common problem of mine) but otherwise, I like the super simple design. Maybe I could add another circle so it's less Happy Engagement! and more Happy Life Together!

Monday, April 25, 2011

Vase + Facelift = Vaselift!


Happy Monday!

Easter has come and gone already. Can you believe it? From a craft stand point, that means we're in bit of a dry spell...except if you love weddings. Then this is like the super holiday season of weddings. And there are also birthdays. Birthdays are mini holidays sprinkled throughout the year to keep us going. I'm always a day or week late on those celebrations including this year when I made a bouquet of flowers for a friend (photos and tutorial will arrive in a few months for that one :) and needed a vase. 

Friday, April 22, 2011

Week 3: Cone Flowers

Welcome back to Week 3 of 52 Weeks of Paper/Fabric Flowers. This week let's try some Cone Flowers. I call these Cone Flowers b/c they are made up of a bunch of tiny little cones. These were a big hit in my husband's and my wedding flowers. These gold ones here would be very elegant as single flowers in a black and gold wedding or you could make festive pink and white for a bridal shower.

What I love about these is that they work as accents. You don't have to make a ton for them to be effective. Let's say you have a live flower bouquet and you need to add an accent of a chartreuse or a pink (or whatever.) Make some of these out of card stock, hit them with appropriately colored spray paint and there you go. Done and done.

This week comes with a video! After the jump:

Wednesday, April 20, 2011

Easter Egg Card (Tutorial)

Easter is this coming weekend! It snuck up unexpectedly but there is still time for the crafty aspects of the holiday.
One thing I did this year was pull out my watercolor paper, paints and combined them with some new skills with masking fluid. Cards are a great way to learn new art techniques without the scary expectations of Creating Art.

I put the tutorial up at my work blog. Check it out!

PS- Everything I learned about masking I learned from the wonderful Linda Baker.

Monday, April 18, 2011

Happy Birthday


I love birthday cards. They can be sweet or funny, quiet or loud. They often have themes like cupcakes and flowers. Who doesn't love cupcakes and flowers? They are also a great excuse to get creative with what you already have laying around your studio. I made this card with a scrap piece of felt I just discovered and paint and paper I had on the desk. I almost couldn't bring myself to add anything over the green and pink background combination. But now I have that tested and approved for something else!

Friday, April 15, 2011

Week 2: Painted Stems

I use brown floral wire for almost all of the fabric flowers I make. When I made flower arrangements for my husband's and my wedding, I kept feeling like something was missing. Originally I thought it was the bulk that leaves make. And while, yes, there was some of that, I think a fair amount was the fact that the stems were brown.

There's an easy solution no further than the 99 cent paint isle of your local craft store. Paint. If it's summer and you've got a lot of stems to make, pull out the spray paint. If you don't have a million to make, use paint and a brush.

Wednesday, April 13, 2011

Half Pom Boutonniere

Last week we learned (or reviewed) a Half Tied Pom. Instead of a stem, I've added two felt leaves, a circle of what could be glitter paper and a pin to make it a boutonniere. This could also be made into a hair clip. Perfect for Easter basket gifts!

Monday, April 11, 2011

Soft Cards

There was a new edition to my extended family this last week and so this little guy is heading to her in the next couple of days. I love the ideas of cards for baby showers and other baby/kid things but rarely have the occasion! These will be showing up in the shop in the next week or so.

Friday, April 08, 2011

Week 1: Pom Flower and Half Tied Pom

Poms have been everywhere on the internet. They are magical. They are furry and cute and you can make them with a ball of yarn, a pair of scissors and a couple of fingers. Pretty magical.

So starting out this 52 weeks of fabric flowers; let's revisit the delightful little pom and hang out with her little sister the half tied pom. 

If you find yourself saying, "What's a pom?" Well, watch the video after the jump.

If you know the pom, let me introduce you to the half tied pom. The half tied gets its name because it's a pom but you stop earlier in the process.

Note: In the video I show you how to put a stem on after you've clipped the flower. After making dozens of these, I learned a very useful tip. Glue the stem on when the flower is in a half tied pom stage. Cut after the glue has dried. This makes adding the stem infinitely more easy.

Video after the jump!

Wednesday, April 06, 2011

Bunny Circle Cuts- Tutorial

Why do more work than you need if you can get a basic start? This is why I love the bunny head from circle. Yes, you could just cut out the head shape, but the punch gives you a great place to start.

Monday, April 04, 2011

Bunny Paste Cards (Tutorial)

I have a tendency to be inspired by products in a store. When we were filming Sherrill Kahn, she mentioned that product inspires her creativity. It wasn't until that moment that I realized that I am the same way. I walk through a craft store and say Sherrill's fantastic phrase, "What if?" Sound familiar?

But sometimes I look around my studio and am aware of how much stuff I own. Also sound familiar? I bought light molding paste when I was learning the techniques in Ann Baldwin's second DVD, "Text & Texture in Mixed Media Collage," which I love. But then the light molding paste sort of sat until I looked at a stack of Goodwill bound craft supplies. I heard Sherrill's phrase, "What if?" again. This is how Paste Cards were born. They are wonderfully filled with texture and the graphic silhouette that is in so much of my work. The light molding paste is fun to use and the possibilities are limitless. Enjoy!

Monday, February 14, 2011

Happy Love Day

Speaking of a Love Day: this is the invite I've been sending out to my sister's and future brother-in-law's friends and family for an engagement party.

Monday, February 07, 2011

Glitter Paper Tutorial


 I always buy glitter when it's on sale. The result is that I have a lot of glitter just lying about. I love glitter but I hate that it gets everywhere so while I have a ton of it, I'm reticent to use it. Enter glitter paper. It's like a glitter sandwich with gel medium as the bread. This year I'm using it to make hair clips and valentines day pins.

Wednesday, January 19, 2011

CraftAmor Etsy Shop